SMALL

Interceptor


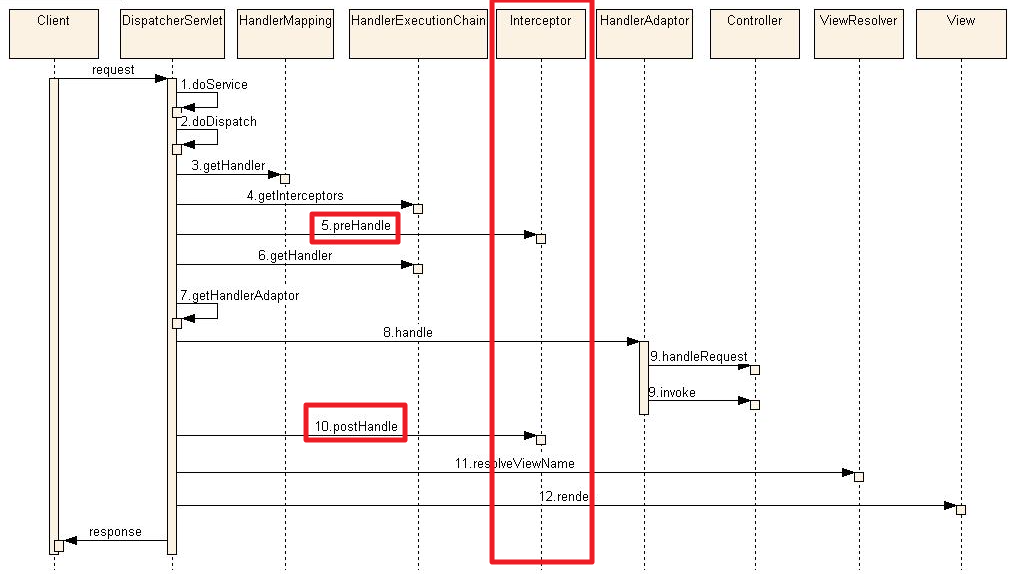
Interceptor는 "가로채다"라는 의미를 가지고 있다.

Spring에서도 해당 의미와 유사하게 

Client에서 Server로 보낸 Request 객체를 Dispatcher Servlet의 Controller에 도달하기 전에 가로채는 역할을 한다.


Interceptor를 통해 가로챈 요청에 추가 로직을 넣을 수도 있고, Request 객체를 검증하는 작업도 할 수 있다. 

출처 : http://www.egovframe.org/wiki/doku.php?id=egovframework:rte:ptl:dispatcherservlet


Interceptor를 사용했을 때의 장점은 아래와 같다

  • 공통 로직을 사용하는 경우 코드 누락에 대한 위험성 감수
  • 코드 재사용성 증가
    • 메모리 낭비, 서버 부하 감수 


어떠한 프로그램이든 공통 로직은 한 곳에서 관리하는 게 가장 좋다.

그런 면에서 Interceptor는 좋은 옵션을 제공한다. 


사용 예제


@Component
public class MyInterceptor implements HandlerInterceptor {

	@Override
	public boolean preHandle(HttpServletRequest request, HttpServletResponse response, Object handler)
			throws Exception {
		// do what you want .. 
		return true;
	}

	@Override
	public void postHandle(HttpServletRequest request, HttpServletResponse response, Object handler,
			ModelAndView modelAndView) throws Exception {
		// do what you want .. 
	}

	@Override
	public void afterCompletion(HttpServletRequest request, HttpServletResponse response, 
 		   Object handler, Exception ex)
			throws Exception {
		// do what you want .. 
	}

}


Interceptor를 구현하기 위해서는 "HandlerInterceptor"를 Implements 받으면 된다.

해당 Interface에는 아래의 3가지 메서드를 제공한다.

  • preHandler(...)
    • Controller가 호출되기 전에 실행된다
    • return 값은 boolean으로 해당 값이 false이면 Controller가 호출되지 않는다
  • postHandler
    • Controller가 호출 된 이후지만, View가 생성되기 전에 실행된다
    • ModelAndView 객체를 인자로 받아 View를 생성하기 전에 해당 객체의 정보를 조작할 수 있다
  • afterCompletion
    • View의 모든 작업이 완료된 후에 호출된다


@Configuration
@RequiredArgsConstructor
public class WebConfig implements WebMvcConfigurer {
	
	private final MyInterceptor interceptor;
    
	@Override
	public void addInterceptors(InterceptorRegistry registry) {

		registry.addInterceptor(interceptor).addPathPatterns("/**");
	}
	
}


작성한 Interceptor를 Spring에 등록하기 위해서는 WebMvcConfigurer를 Implements 하여서 코드를 추가해야 한다. 


WebMvcConfigurer 해당 Interface에 addInterceptors라는 메서드에서 추가해 주면 된다. 

또한 해당 Interceptor가 어떠한 조건일 때 실행되고, 실행되지 않는 등의 설정을 추가할 수 있다.


LIST
SMALL

Spring Boot Appliction이 실행되는 시점에 특정 코드를 추가하고 싶은 경우가 존재할 것이다.

이런 경우에 어떻게 해야하는지 알아보도록 하자.

CommandLineRunner


@Component
public class InitCommand implements CommandLineRunner {

	@Override
	public void run(String... args) throws Exception {
		// do somethings ..
	}
}


ApplicationRunner


@Component
public class InitAppliation implements ApplicationRunner {
	@Override
	public void run(ApplicationArguments args) throws Exception {
		// do somethings .. 
	}
}


차이점

두 interface 모두 run이라는 메서드를 제공하고, 해당 메서드에서 원하는 로직을 작성하면 된다.

그렇다면 이 둘의 차이점은 무엇일까? 


차이점으로는 메서드에 arguments이다. 

CommandLineRunner는 String Array를 Application Runner는 ApplicationArguments를 인자로 받는다.

그렇 각각의 값들을 어떻게 세팅하고 어떻게 꺼내 쓰는지 알아보도록 하자.


java -jar SpringApp.jar agrs1 args2 --name=junsu --type=child


위와 같은 형태로 Application을 실행시켰다고 하면 

CommandLineRunner에서는 String Array로 해당 값들을 아래와 같이 받을 수 있다.

	@Override
	public void run(String... args) throws Exception {
		System.out.println("#######################################");
		for (String str : args) {
			System.out.println(str);
		}
		
	}


ApplicationRunner에서는 ApplicationArguments의 메서드들을 이용해서 값들을 가져올 수 있다.

NonOptionArgs와 Option(Name, Value)로 나누어서 값을 가져올 수 있게 되어있다. 


	@Override
	public void run(ApplicationArguments args) throws Exception {

		System.out.println("*******************************************");
		args.getNonOptionArgs().forEach(str -> System.out.println(str));

		args.getOptionNames().forEach(str -> {
			System.out.print(str + " -- ");
			System.out.println(args.getOptionValues(str).get(0));
		});
		
		System.out.println(args.getOptionValues("name"));
	}


LIST
SMALL


Spring Boot Admin에서 기본적으로 타겟 client의 application.properties 설정값을 조회할 수 있다.


그럼 다음으로 해당 설정 값을 바꿀 수 있는 방법에 대해서 알아보자.


pom.xml ( dependency 설정 )

		<dependency>
			<groupId>org.springframework.cloud</groupId> 
			<artifactId>spring-cloud-context</artifactId>
		</dependency>


application.properties ( spring boot 설정 )

management.endpoint.env.post.enabled=true


위의 설정들을 추가하면 아래와 같이 해당 화면의 설정할 수 있는 부분이 생기게 된다. 


LIST
SMALL

Spring Boot Admin 화면에서 조회되는 Client들의 상태 정보를 추가적으로 조회할 수 있는 것들이 무엇이 있는지 알아보고 어떻게 설정해야 하는지 파악해보자.

크게 아래와 같이 구분할 수 있을것 같다.

  • JMX-Bean 관리
  • Logger ( Log 내용 실시간 조회 )
  • Build Version정보 파악 
  • Tag 정보 추가

이 기능들은 기본적으로 설정한 Spring Boot Admin 화면에서는 조회되지 않고 추가적으로 설정을 해주어야지 조회가 가능하다.


JMX-Bean 관리

우선 이 기능이 무엇이지 알아보도록 하자.

JMX ( Java Management eXtension ) 
-> JMX는 실행 중인 애플리케이션의 상태를 모니터링하고, 설정을 변경할 수 있게 해주는 API
-> JDK 1.5부터 포함된 사양

JConsole과 같은 미리 구현된 모니터링 도구를 이용하여 MBean 서버에 접근할 수 있다.

JMX를 통해 리소스 관리를 하려면 MBeans라는 Managed Beans를 생성해야 하고, 

생성한 MBean을 MBean Server에 등록해야 한다. 

MBean 서버는 등록된 MBeans를 관리하는 agent 역할을 수행하게 된다. 


이제 JMX가 무엇인지 알았으니 Spring Boot Admin에서 JMX 기능을 사용하는 방법을 알아보자.


pom.xml ( dependency 설정 )

		<dependency>
			<groupId>org.jolokia</groupId>
			<artifactId>jolokia-core</artifactId>
		</dependency>


application.yml( spring boot 설정 )

spring:
  jmx:
    enabled: true


이렇게 설정을 하면 Spring Boot Admin에 JVM 메뉴 하위에 JMX 메뉴가 추가된다.

여기서 추가한 jolokia라는것은 무엇인지 의문이 들었다.

해당 모듈이 무엇인지 찾아본 내역은 아래와 같다.

Jolokia
-> HTTP 프로토콜을 이용해 손쉽게 JMX 값을 JSON 형식으로 받아볼 수 있게 해주는
    일종의 JMX-HTTP 커넥터

위의 JMX를 설명하며 언급한 JConsole이 JMX를 관리하기 위한 툴이었다면, Jolokia는 JMX에서 관리하는 Bean들의 내용을 조회 및 액션을 수행하기 위한 HTTP 호출 툴(?), 커넥터라고 이해하면 될 것 같다.


Logger ( Log 내용 실시간 조회 )

기본으로 제공되는 Spring Boot Admin의 Logger기능은 Log Level를 변경하는 것이다.

거기에 추가적으로 로그의 내용들을 조회하고 싶은경우에는 추가적인 application.yml 파일 설정이 필요하다.


application.yml( spring boot 설정 )

logging:
  file:
    name: "/var/log/sample-boot-application.log"    
  pattern:
    file: "%clr(%d{yyyy-MM-dd HH:mm:ss.SSS}){faint} %clr(%5p) %clr(${PID}){magenta} %clr(---){faint} %clr([%15.15t]){faint} %clr(%-40.40logger{39}){cyan} %clr(:){faint} %m%n%wEx"


log파일의 위치를 명시적으로 지정해 주어야한다.

( 추가 적으로 log의 패턴도 지정할 수 있다) 


Build Version정보 파악 

Spring Boot의 빌드 버전 정보는 META-INF/build-info.properties 위치에서 쉽게 파악할 수 있다.

해당 정보를 생성하기 위해서는 추가적인 설정이 필요하다.


pom.xml ( dependency 설정 )

<build>
    <plugins>
        <plugin>
            <groupId>org.springframework.boot</groupId>
            <artifactId>spring-boot-maven-plugin</artifactId>
            <executions>
                <execution>
                    <goals>
                        <goal>build-info</goal>
                    </goals>
                </execution>
            </executions>
        </plugin>
    </plugins>
</build>

해당 정보를 추가해 주면 Spring Boot Admin 화면에서 실행 중인 Appliation의 빌드 버전 조회가 가능해진다.


Tag 정보 추가

Tag 정보는 단순히 해당 Application에 대한 정보를 추가적으로 표시하기 위한 용도이다.

관리하는 Appliation의 종류가 많아지는 경우에는 해당 Tag를 통해 좀 더 쉽게 Application들의 관리가 이루어질 수도 있을 것 같다.


application.yml( spring boot 설정 )

spring:
  boot:
    admin:
      client:
        instance:
          metadata:
            tags:
              environment: "tag-test1"
info:
  tags:
    environment: "tag-test1"


LIST

+ Recent posts