SMALL

Mybatis란

Mybatis는 Psersistence Framework 중에 하나로 SQL Mapper Framework에 해당한다.

https://joomn11.tistory.com/34

위의 글에서 해당 내용에 대한 정리를 해두었으니 참고하면 이해가 잘 될 것이다.


Mybatis 특징

  • 복잡한 쿼리나 다이나믹 쿼리에 유용하다
  • 비즈니스 코드와 SQL 쿼리를 분리해서 관리 가능하다 ( 간결성, 코드 유지 보수성 향상 )


SpringBoot + Mybatis 

spring-boot의 mybatis-spring-boot-starter를 활용하여 스프링 프로젝트에서 손쉽게 Mybatis를 사용할 수 있다. 


mybatis-spring-boot-starter의 장점

  • spring에서 추가된 mybatis bean 등록을 자동으로 해준다
    • SqlSessionFactoryBean, SqlSessionTemplate


pom.xml

		<dependency>
			<groupId>org.mybatis.spring.boot</groupId>
			<artifactId>mybatis-spring-boot-starter</artifactId>
			<version>2.2.2</version>
		</dependency>


mapper.xml

<?xml version="1.0" encoding="UTF-8"?>
<!DOCTYPE mapper PUBLIC "-//mybatis.org//DTD Mapper 3.0//EN" "http://mybatis.org/dtd/mybatis-3-mapper.dtd" >
<mapper namespace="com.sample.dao.MapperDAO">
	<select id="selectAll"
		resultType="com.sample.dto.UserDto">
		SELECT *
		FROM user_test
	</select>
	<insert id="insert" parameterType="com.sample.dto.UserDto">
		INSERT INTO user_test (seq, name, country) values ( #{seq}, #{name},
		#{country})
	</insert>
</mapper>


Mapper interface

@Repository
@Mapper
public interface MapperDAO {
    List<UserDto> selectAll() throws Exception;
    void insert(UserDto user);
}


Service 

@Service
public class UserService {

    @Autowired
    private MapperDAO mapperDao;
    
    public List<UserDto> selectAll() throws Exception {
        return mapperDao.selectAll();
    }
    
    public void insert(UserDto user) {
        mapperDao.insert(user);
    }
}


application.yml 설정

mybatis:
  mapper-locations:
  - com/sample/mapper/*.xml
  config-location: classpath:mybatis-config.xml
  • mybatis.mapper-locations : mapper관련 xml 파일이 존재하는 디렉터리의 위치
  • mybatis.config-location : mapper configuration관련 xml을 사용한다면 해당 위치에 대한 정보


mybatis github sample

https://github.com/mybatis/spring/tree/master/src/test/java/org/mybatis/spring/sample


mybatis사이트 가이드

http://mybatis.org/spring-boot-starter/mybatis-spring-boot-autoconfigure/#


LIST
SMALL

Spring Cloud Netflix Eureka

MSA 환경에서는 Service의 Ip, Port 정보가 일정하지 않고 지속적으로 변화할 수 있다.

이러한 환경에서 Service의 정보를 수동으로 입력하고 관리하는 것은 한계가 분명하다.

이를 Service Discovery를 통해 해결할 수 있다.


Eureka의 구성 요소

Service Discovery

  • 외부에서 마이크로 서비스의 위치를 찾아주기 위한 기능

Service Registry

  • 각각의 서비스가 자신의 위치(Ip, Port) 정보를 특정 버서에 등록(Registry)하는 작업


Eureka 사용 예시

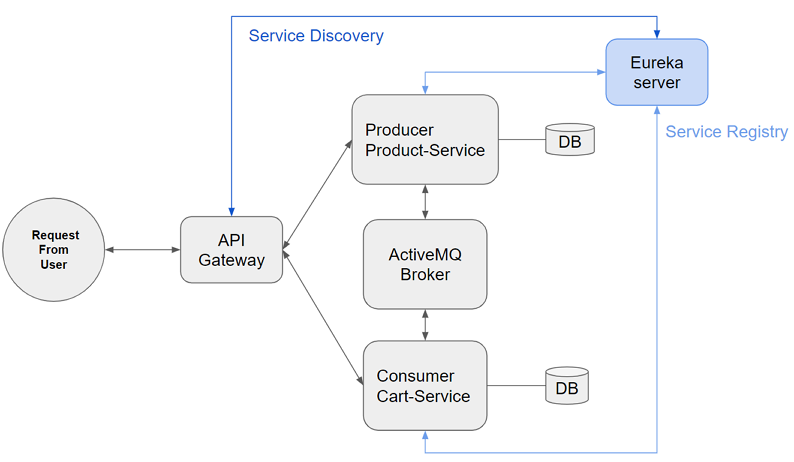
기존에 작성한 포스팅에서 API Gateway를 사용하였다.

(https://joomn11.tistory.com/123)


해당 설정에서 API Gateway의 설정에 각각의 서비스들의 물리적인 정보가 그대로 적혀있다.

이러한 경우 서비스의 물리적 정보가 변경되는 경우 API Gateway도 변경되어야 하는 디펜던시가 생기게 된다.

이러한 상황을 방지하기 위해 Service Discovery를 사용해보자.


Eureka Server 


dependency 추가 (build.gradle)

dependencies {
	implementation 'org.springframework.cloud:spring-cloud-starter-netflix-eureka-server'
}


application.yml 설정

server:
  port: 8761
eureka:
  client:
    register-with-eureka: false
    service-url:
      default-zone: http://${eureka.instance.hostname}:${server.port}/eureka
    fetch-registry: false
  instance:
    hostname: localhost


Annotation 추가

@SpringBootApplication
@EnableEurekaServer
public class EurekaServerApplication {

	public static void main(String[] args) {
		SpringApplication.run(EurekaServerApplication.class, args);
	}

}


Eureka Client


dependency 추가 (build.gradle)

dependencies {
	implementation 'org.springframework.cloud:spring-cloud-starter-netflix-eureka-client'
}


application.yml 설정

eureka:
  instance:
    appname: product-service
  client:
    fetch-registry: true
    service-url:
      defaultZone: http://localhost:8761/eureka


Annotation 추가

@SpringBootApplication
@EnableEurekaClient
public class ProductServiceApplication {

	public static void main(String[] args) {
		SpringApplication.run(ProductServiceApplication.class, args);
	}

}


API Gateway

위와 같이 Eureka Server, Client를 설정해두면, API Gateway의 설정 정보 중에 물리적인 주소를 하드 코딩한 부분을 수정해 줄 수 있다.


spring:
  application:
    name: gateway
  cloud:
    gateway:
      routes:
        - id: product-service
          # uri: http://localhost:8045
          uri: lb://PRODUCT-SERVICE
          predicates:
            - Path=/product/**
        - id: cartservice
          # uri: http://localhost:8050
          uri: lb://CARTSERVICE
          predicates:
            - Path=/cart/**


LIST
SMALL

Spring Cloud Gateway란 

API Gateway이다

    (사용자의 요청을 받고 적절한 MicroService에게 라우팅 해주는 서버)

    (API Gateway는 Reverse Proxy 기능을 향상한 것이다)

        (Reverse Proxy : 클라이언트의 요청을 받고 이 요청을 적절한 Backend 서버로 라우팅 해주는 서버) 

라우팅 이외에도 보안, 모니터링/메트릭 등의 기능을 간단하고 효과적인 방법으로 제공한다.

API Gateway 특성상 모든 요청이 거쳐가는 곳이기 때문에 성능이 매우 중요하다.

- 비동기식 이벤트 기반의 WAS인 Netty를 사용

Spring5, SpringBoot2, ProjectReactor로 구축되었다


Spring Cloud Gateway 주요 특징

Route

클라이언트의 요청을 어느 서버로 라우팅 할 것인지를 나타내는 내용

목적지 URI, Predicates, Filter로 이루어져 있다.


Predicate

요청이 어떤 Path인지 또는 어떤 헤더를 가지고 있는지에 대한 조건 


Filter

Spring WebFilter 인스턴스, Filter를 통해서 요청 또는 응답을 변경할 수 있다


사용 예시 - application.yml

spring:
  cloud:
    gateway:
      routes:
        - id: product-service
          uri: http://localhost:8045
          predicates:
            - Path=/product/**
        - id: cartservice
          uri: http://localhost:8050
          predicates:
            - Path=/cart/**


Microservice를 구축할 경우

다양한 서비스들이 존재할 텐데 사용자가 각각의 서비스들의 주소를 모두 알 수도 없고 알아서도 안된다.

이런 경우에는 사용자의 요청을 API Gateway에서 받고

해당 요청을 받은 API Gateway가 각각의 요청을 적당한 microservice로 라우팅 해주어야 한다


위의 시나리오를 구현한 설정값들을 알아보도록 하자


API Gateway 설정


spring:
  cloud:
    gateway:
      routes:
        - id: product-service
          uri: http://localhost:8045
          predicates:
            - Path=/product/**
        - id: cartservice
          uri: http://localhost:8050
          predicates:
            - Path=/cart/**


Dependency 추가 ( gradle )

dependencies {
	implementation 'org.springframework.cloud:spring-cloud-starter-gateway'
}
LIST
SMALL

ActiveMQ란

간단하게 ActiveMQ는 메시지 브로커이다.

JMS를 지원한다( JMS: Java Message Service) ( JMS는 스펙이고, 그것을 구현해 좋은 제품이 ActiveMQ)

ActiveMQ를 사용하는 이유 

대부분의 동기식 통신 방식은 사용자로부터 받은 요청을 전부 처리할 때까지 Blocking 상태에 빠진다

요청을 모두 처리해야 사용자에게 응답을 줄 수 있다

하지만 메시지 큐 사용 시 요청을 큐에 넣고 Block상태에 빠지지 않고 응답을 줄 수 있다

후에 다른 서비스에서 큐에 쌓인 요청을 Consume 하여 요청을 처리할 수 있다


ActiveMQ 설치


https://activemq.apache.org/components/classic/download/ 


ActiveMQ


activemq.apache.org

다운로드한 파일을 unzip후에 bin폴더에 activemq 실행


ActiveMQ TCP prot : 61616

ActiveMQ WebConsole : http://127.0.0.1:8161 ( default user : admin / admin )


이제부터 실전 예제를 보자

예제로는 Product-Service와 Cart-Service가 존재한다

두 서비스 사이에 ActiveMQ를 두고

Product에서 ActiveMQ에 메시지를 produce 하고

Cart에서 ActiveMQ에 쌓인 메시지를 consume 한다.

ActiveMQ - Producer 


@RestController
@RequestMapping("/product")
@RequiredArgsConstructor
public class ProductController {

    private final ProductRepository productRepository;
    private final JmsTemplate jmsTemplate;
    private final ObjectMapper mapper;

    // get value from yaml file
    @Value("${product.jms.destination}")
    private String jmsQueue;

    @GetMapping("/sendToCart/{id}")
    public ResponseEntity<Product> sendToCart(@PathVariable long id) {
        Optional<Product> product = productRepository.findById(id);

        if (!product.isPresent()) {
            return new ResponseEntity<>(HttpStatus.NOT_FOUND);
        }

        try {
            String jsonInString = mapper.writeValueAsString(product.get());

            jmsTemplate.convertAndSend(jmsQueue, jsonInString);

            return new ResponseEntity<>(product.get(), HttpStatus.OK);
        } catch (Exception e) {
            e.printStackTrace();
            return new ResponseEntity<>(HttpStatus.INTERNAL_SERVER_ERROR);
        }
    }
}


application.yml

server:
  port: 8045
spring:
  activemq:
    user: admin
    password: admin
    broker-url: tcp://localhost:61616
  application:
    name: product-service
product:
  jms:
    destination: product

ActiveMQ 설정 정보는 간단하다

  • ActiveMQ의 위치정보 (IP, Port)
  • ActiveMQ에 접근하기 위한 권한 정보

이외에 product.jms.destination은 특정값을 설정값으로 분리하여 관리하기 위해 임의로 추가한 값이다.

(코드에 해당 값을 String으로 선언해도 되지만, yml 설정으로 분리) 


ActiveMQ - Consumer

@Component
@RequiredArgsConstructor
@Slf4j
public class JmsConsumer {

    private final ProductRepository productRepository;
    private final ObjectMapper mapper;

    @JmsListener(destination = "${product.jms.destination}")
    public void consumeMessage(String data) {
        try {
            Product product = mapper.readValue(data, Product.class);

            log.info("data: {}", data);
            productRepository.save(product);

        } catch (Exception e) {
            e.printStackTrace();
        }
    }
}


application.yml

server:
  port: 8050
spring:
  application:
    name: cartservice
  activemq:
    user: admin
    password: admin
    broker-url: tcp://localhost:61616
product:
  jms:
    destination: product


참고&git


LIST

+ Recent posts