일반적인 환경에서 Spring Boot Application을 띄우는 경우 이외에,
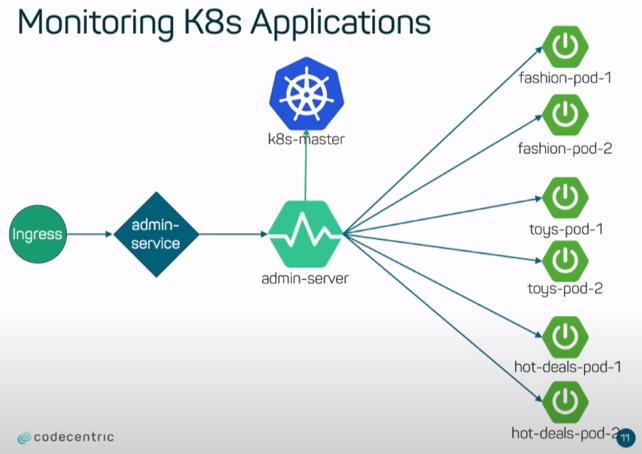
Kubernetes 환경에 Spring Boot Application을 띄우는 경우에 해당 Application에 대한 정보를 모니터링하고 싶은 경우에 사용하는 방법을 알아보도록 하자.
아래와 같은 목차로 설명하도록 하겠다.
- Kubernetes 환경 리소스 생성
- SpringBootAppliation 설정 ( Server, Client)
- Dockerimage 생성
- Kubernetes ( Deployment, Service ) 생성
Kubernetes 환경 리소스 생성
먼저 Spring Boot Admin의 Server에서 Kubernetes관련 정보를 수집할 수 있는 권한이 필요하다.
이에 해당하는 Role, ServiceAccount, RoleBinding 관련 리소스를 생성해보자.
kind: Role
apiVersion: rbac.authorization.k8s.io/v1
metadata:
  namespace: {user_ns}
  name: admin
rules:
  - apiGroups: ["", "extensions", "apps"]
    resources: ["configmaps", "pods", "services", "endpoints", "secrets"]
    verbs: ["get", "list", "watch"]
apiVersion: v1
kind: ServiceAccount
metadata:
  name: admin
kind: RoleBinding
apiVersion: rbac.authorization.k8s.io/v1
metadata:
  name: admin
  namespace: {user_ns}
subjects:
- kind: ServiceAccount
  name: admin
  apiGroup: ""
roleRef:
  kind: Role
  name: admin
  apiGroup: ""
해당 리소스들의 관계는 Kubernetes 리소스 관련 control을 할 수 있는 Role (권한)이 있고,
해당 권한과 ServiceAccount를 Binding해주는 RoleBinding이 있다.
RoleBinding을 통해서 특정 ServiceAccount는 Kubernetes 리소스를 control 하는 Role을 가지게 된다.
추후에 Kubernetes Deployment를 생성할때 해당 ServiceAccount 정보를 기입하면 해당 Deployment는 Role을 가질 수 있게 된다.
SpringBootAppliation 설정 (Server)
pom.xml ( dependency 설정 )
		<dependency>
			<groupId>de.codecentric</groupId>
			<artifactId>spring-boot-admin-starter-server</artifactId>
		</dependency>
		<dependency>
			<groupId>org.springframework.cloud</groupId>
			<artifactId>spring-cloud-starter-kubernetes</artifactId>
		</dependency>
application.yml( spring boot 설정 )
spring:
  cloud:
    kubernetes:
      discovery:
        service-labels:
          type: spring-boot #해당 label이 붙은 k8s 리소스만의 정보만 조회 가능
  boot:
    admin:
      monitor:
        status-interval: 3s
        status-lifetime: 3s
Spring Main Application
@SpringBootApplication
@EnableAdminServer
@EnableScheduling
@EnableDiscoveryClient // !!
public class SbaK8sServerApplication {

	public static void main(String[] args) {
		SpringApplication.run(SbaK8sServerApplication.class, args);
	}

}
SpringBootAppliation 설정 (Client)
pom.xml ( dependency 설정 )
		<dependency>
			<groupId>de.codecentric</groupId>
			<artifactId>spring-boot-admin-starter-client</artifactId>
		</dependency>
application.yml( spring boot 설정 )
server:
  port: 8082

management:
  endpoints:
    web:
      exposure:
        include: "*"
  endpoint:
    health:
      show-details: always
Dockerimage 생성
Kubernetes에 Pod를 띄우기 위해서는 Dockerimage를 생성하여 Deployment에 해당 정보를 넣어주어야한다.
여기서는 자세하게 다루지 않고, 생성하기 위한 명령어들만 간단하게 공유하도록 하겠다.
 # client
 docker build -t sba-client:v1 ./
 docker push sba-client:v1
 # server
 docker build -t sba-server:v1 ./
 docker push sba-server:v1
Kubernetes Spring Boot Admin Server( Deployment, Service ) 생성
apiVersion: apps/v1
kind: Deployment
metadata:
  namespace: {user_ns}
  name: admin-pod
  labels:
    type: spring-boot
spec:
  replicas: 1
  template:
    metadata:
      labels:
        app: admin
    spec:
      serviceAccountName: admin
      containers:
        - image: {sba-server_image_name}
          name: admin
          env:
            - name: management.endpoints.web.exposure.include
              value: "*"
            - name: management.endpoint.health.show-details
              value: "always"
          ports:
            - containerPort: 8080
          resources: {}
          readinessProbe:
            httpGet:
              path: /actuator/health
              port: 8080
            initialDelaySeconds: 10
            timeoutSeconds: 2
            periodSeconds: 5
            failureThreshold: 5
          livenessProbe:
            httpGet:
              path: /actuator/health
              port: 8080
            initialDelaySeconds: 20
            timeoutSeconds: 2
            periodSeconds: 8
            failureThreshold: 5
      restartPolicy: Always
  selector:
    matchLabels:
      app: admin
apiVersion: v1
kind: Service
metadata:
  namespace: {user_ns}
  name: admin-service
  labels:
    type: spring-boot
spec:
  type: NodePort
  ports:
    - name: "http"
      port: 8080
      targetPort: 8080
  selector:
    app: admin
Kubernetes Client ( Deployment, Service ) 생성
apiVersion: apps/v1
kind: Deployment
metadata:
  namespace: {user_ns}
  name: {user_pod_name}
  labels:
    type: spring-boot
spec:
  replicas: 1
  template:
    metadata:
      labels:
        app: {user_pod_name}
    spec:
      containers:
        - image: {user_image_name}
          name: {user_pod_name}
          env:
            - name: management.endpoints.web.exposure.include
              value: "*"
            - name: management.endpoint.health.show-details
              value: "always"
          ports:
            - containerPort: 8082
          resources: {}
          readinessProbe:
            httpGet:
              path: /actuator/health
              port: 8082
            initialDelaySeconds: 10
            timeoutSeconds: 2
            periodSeconds: 5
            failureThreshold: 5
          livenessProbe:
            httpGet:
              path: /actuator/health
              port: 8082
            initialDelaySeconds: 20
            timeoutSeconds: 2
            periodSeconds: 8
            failureThreshold: 5
      restartPolicy: Always
  selector:
    matchLabels:
      app: {user_pod_name}
Service에 대한 내용은 Spring Boot Admin Server와 동일하다. ( port 정보만 중복되지 않도록 바꾸어주면 된다)
이번 포스팅의 내용을 대략적으로 보면 기본적으로 Kubernetes의 리소스를 사용하기 위한 설정이 대부분이었던 것 같다.
핵심으로는 Kubernetes환경에서 Spring Boot Admin을 사용하기 위해서 해야 하는 Application에 설정해야 하는 부분에 집중하면 될 것 같다.
(Server에서 Client를 찾을 수 있도록 Applicaiton에 설정을 추가해주는 부분)
'Spring > spring-boot-admin' 카테고리의 다른 글
| [Spring] Spring Boot Admin Client의 application 설정 값 변경 (0) | 2021.07.02 |
|---|---|
| [Spring] Spring Boot Admin Client 부가적인 메뉴 추가 (0) | 2021.06.24 |
| [Spring] Spring Boot Admin 사용해보기 (+Security) (0) | 2021.06.22 |
| [Spring] Spring Boot Admin 사용해보기 (0) | 2021.06.21 |